The number one concern about undergoing a printing project is your design not looking exactly how you envision it. If you’re not a design expert, which most of us aren’t, there are some small but very important details that we tend to not only overlook, but misunderstand.
Some of those smaller details you can’t miss when sending in your designs for print, including the bleed, trim, and safe zones. Knowing and understanding these specs will make your prints look their best.
Before we get into the meat of it, let’s clear up why you, as a customer, need to be mindful of providing a printing service with these specs. While our state of the art equipment will deliver the best looking final product, there is still a margin of error with the operation.
Therefore, the machine’s that are used for cutting your materials after printing may not cut your image perfectly. To eliminate this possibility, we recommend that the edge of the background image to your product extend beyond that initial edge.
Now that you understand why it’s important to take these steps on your end to achieve a perfect print job, here’s an easy tutorial on how the bleed, trim and safe zone in printing function, so that your prints never look less than perfect again.
Trim Zone
Let’s start with the trim. The trim zone is a technical way to refer to the finished size of a product. For example, a standard 4” x 6” postcard is also its trim size. This means in a layout file, the trim lines show you where the product will be cut down to its desired size.
Why does the trim size matter? Well, as you upload your design, it’s useful to be aware of where your trim edges are so that you may extend your image further than the edge, in order to eliminate any margin or error that is bound to occur when your product gets trimmed.

To establish where, and how much of your image should go beyond the trim edge, is everything that falls over into the bleed zone. The size in which your images should extend into both of these margins will be listed in the next section, the bleed zone.
Bleed Zone
To make it simple, a bleed is the extra margin on print materials that is meant to be trimmed off when the product is trimmed to its final size. It literally means that the color and graphics on a product will “bleed off the page” so that when your image reaches the edge, it won’t leave any unwanted white edges.
You can set your bleed in a layout file by extending past the trim line to where the blade will cut through. You may be asking yourself why you have to incorporate a bleed zone in the first place.
Giving yourself a bleed zone will help eliminate the inevitable margin of error where the actual cut is made. If you don’t include a bleed, there will be a white border left on the edges.

To know the exact size to extend your artwork with a bleed zone depends on the product you’re printing. For example, most business cards have a 0.1” bleed, meaning a standard 2” x 3.5” sized card will have a bleed size of 2.1” x 3.6”.
See the list below for the correct bleed size for GotPrint products. These sizes should also apply for your trim size.
- 0.1″ bleed: most business cards, folded business cards, bookmarks, CD packages, club flyers, collectors cards, DVD packages, event tickets, most postcards, rack cards, rip business cards, rolodex cards, stickers, table tents, greeting cards, “wink” special shapes.
- 0.125″ bleed: a-frame signs, banners, brochures, door hangers, envelopes, flyers, folded hang tags, hang tags, illumaprint panels, letterheads, mini menus, notepads, posters, posters (wide), roll labels, retractable banner stands, staggered cut flyers, window clings, window decals, yard signs.
- 0.25″ bleed: booklets, calendars, catalogs
- 0.3″ bleed: folders
- 0.325″ bleed: business cards with round corners in either 2” x 3.5” and 3.35” x 2.17” size. Postcards with round corners in the following sizes: 4” x 6”, 5.5” x 8.5”, 4.25” x 5.5”, 5” x 7”. All special shapes, except for “wink” special shape, which is 0.1″.
Safe Zones
Now that we’ve covered the hard parts, the last step seems more apparent. However, you still need to be careful about what you put into your safe zone.
The safe zone is the area where all the most important, critical elements (such as text, images, logos, etc) are placed. Making sure they are within the safe zone is the only way to avoid these elements from being trimmed off once the product is trimmed to the final size.
If you extend your text, images, or logos to the very edge, then you are risking those elements being cut off! You must give plenty of room for your safe zone, because even the smallest deviation could result in an uneven finished job. It is often recommended by design experts to allow your images to have at least 5mm-6mm around the edges of your product.
The actual cut can happen anywhere between the bleeds and the safety margins, so it’s important to allow plenty of room for mechanical tolerances. Keep in mind that wider margins help to accommodate more printers while preserving the integrity of your designs.
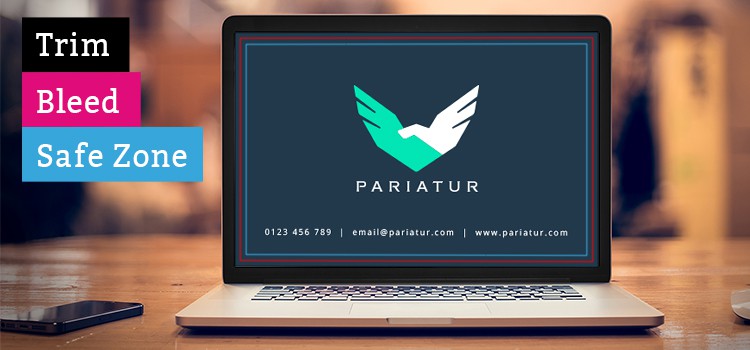
The diagram below shows you where to keep all of the critical elements you want to go into your print job.
